WHAT'S NEW?
Loading...

Chocolate & Orange Popsicles

Okay, so I know putting 'popsicles' and 'hot' in the same sentence is kind of creating an oxymoron but these are in fact hot chocolate popsicles. Because you see I used this dangerously delicious vegan hot chocolate powder from Esamée Store that they were so kind to send me a while back. The only ingredients in this mix are organic coconut sugar, vegan coconut milk powder, organic raw cacao, organic cinnamon and maltodextrin. All you have to do is mix a couple of teaspoons with a cup of boiling hot water and voilà, there's a steaming cup of vegan hot chocolate for you. Yes, I am sold.

Also, chocolate and orange is a match made in heaven and I'm all about those divine flavour combinations. And there are only 5 ingredients so NO EXCUSES. You could even enjoy it in it's semi-liquid state as a beautiful chocolate milkshake!

Hot Chocolate & Orange Popsicles


Ingredients:

150 ml or 2/3 cup full fat coconut milk

150 g frozen bananas (about 1 1/2 medium sized)

1 tbsp Honest Hot Chocolate Powder from Esamée or 1 tbsp coconut sugar

1 tbsp cocoa or cacao powder

Zest from 1 organic orange

How to:

1. Slice the bananas and put them in an airtight plastic container in the freezer and leave it there for at least 8 hours to freeze.
2. Place the frozen bananas, hot chocolate powder/coconut sugar, cocoa powder and orange zest in a food processor and blend for about one minute.
3. Pour in the coconut milk through the hole on top of the food processor, little by little. Stop to scrape down the sides if necessary.
4. Divide the 'ice cream' in six popsicle moulds and freeze overnight.
5. Enjoy!


Vegan Macaroni and Cheese

Behold my attempt to veganize this good old classic loved and cherished by people all over the world. Here in Sweden it goes by 'Makaronipudding', which literally means 'Macaroni Pudding'.  I know for you English people that's something else but this is the kind of mac 'n' cheese that most people are familiar with; the savoury one. 

But how does one make macaroni and cheese without the cheese? Well, there's this wonderful little thing called nutritional yeast that can replace the cheese. I know, cheese addicts out there, this may seem hard to grasp. Because yeast? Doesn't sound so appealing. But it is! Since going vegan, I don't think a single day has gone by without me using it in at least something. It adds a cheesy, savoury flavour that is just too good for words. Another of the reasons why I love it so much is because one single tablespoon provides you with almost all of the B-vitamins that you need. One tablespoon!

So I hope I've convinced you to start incorporating this miracle ingredient into more of your meals. And vegans, this is especially directed at you. Buy it. Just do it.

Vegan Macaroni and Cheese


Serves: 1

3 oz./80 g uncooked brown rice pasta, preferably macaroni or fusilli (or pasta of your choice)

4 oz./110g silken tofu, firm

2 tbsp nutritional yeast

1 1/2 - 2 tbsp vegan cream substitute (such as Oatly iMat 15%)

1 tsp lemon juice

1 pinch nutmeg

Cherry tomatoes (optional)

Salt and pepper to taste

How to:

1. Boil pasta according to instructions on package.
2. Pre-heat oven to 200C
3. Put the remaining ingredients in a small bowl and blend with a hand blender until smooth. Season as you go, don't skimp on the salt but don't use too little either!
4. When the pasta is done, drain and pour it into the bowl with the 'cheese' sauce. Stir well and make sure that all the pasta is covered with sauce.
5. Pour the 'macaroni and cheese' into 1-2 ramekins or a small casserole like the one on the picture. Halve cherry tomatoes and put a few on top. 
6. Sprinkle with some additional nutritional yeast and bake in the oven for 25 minutes. Check it now and then to make sure it doesn't burn on top!
7. Serve immediately.


Lemon-Lime Snowball Truffles

Christmas recipe alert! It's been a while since the last time, as per usual. But hey, no sad faces. Christmas is just around the corner and if you haven't made my Rocky Road Fudge yet then it's definitely time to warm up (chill down?) with these über cute snowballs. Aww. I was actually tempted to build a tiny little truffle snowman out of these but we had a plumber working in the kitchen so... Yeah. One has to know when such weirdness needs to be constrained. But once you've had your first taste I promise you'll be just as obsessed as I am!


The citrus notes in these marry perfectly with the mellow coconutty taste and make one hell of a flavour combination if I may say so myself. It's just one of those meant-to-be combos, like banana and peanut butter, strawberries and cream, chocolate and anything...


Lemon-Lime Snowball Truffles


Yields: 12 bite-sized truffles

Filling:

3/4 cup oats/oat flour (75g)

6 pitted dates (85g)

2 tbsp desiccated coconut (15g)

1 1/2 tbsp coconut oil (21g)

2 tbsp plant based yoghurt (40g)

Zest of 1/2 lemon

White Chocolate Shell:


2 tbsp cacao butter (could sub for coconut oil but not recommended)

2 tbsp coconut cream (the thick layer on top of a can of coconut milk that has been chilled overnight in the fridge)

1 tbsp lucuma powder (Or coconut sugar if you want it sweeter)

Desiccated coconut (as much as you like) and the zest of one lime

How to:

1. Put oats, lemon zest and desiccated coconut in a food processor and blend until a fine flour forms.

2. Place the remaining ingredients for the filling into the food processor and blend again until smooth. (Skip the first step if you already have your oat flour ready)
3. Roll the dough into approximately 12 small balls and place in an airtight container in the freezer for a least an hour to firm up.
4. When the truffles are (freezing) cold, prepare the 'white chocolate' by melting the cacao butter over a hot-water bath and stirring in the lucuma powder and coconut cream. You could adjust the ratios to your own preferences here, feel free to play around!
6. In another bowl, mix the desiccated coconut with the lime zest. This will go onto the truffles once they have been coated with chocolate.
7. Keep the white chocolate in a warm bowl to stop it from setting, then take one truffle and pierce it halfway through with a wooden skewer. Dip the truffle into the chocolate and make sure it gets an even layer all the way around.
8. Sprinkle with as much of the desiccated coconut-lime zest topping as you want.
9. Secure the skewer in an upright position. This can be a bit tricky but a styrofoam board will work amazingly! I usually balance mine in the toaster (truffle-side up!) but be creative... Repeat this process with all the balls.
10. Once the coating has set enough to allow for the truffles to be removed from the skewers, place them in an airtight container and store in the freezer.

Enjoy!

Black Bean and Sweet Potato Quesadillas


I have had a hard time coming up with savoury recipes that don't include hummus or chickpeas in some form (some people smoke, others abuse chickpea dips, what can I say) but then these utterly delicious and chickpea-free quesadillas came to me in a flash of inspiration. A Pinterest flash that is- always my runner-up source of vegspiration. (Instagram comes first!) They're filled with sweet, spicy, savoury amazingness and topped with a goddamn gorgeous green guacamole. Add the simplicity and I know that this will nick a place as one of my top ten lunch recipes.


Make these for yourself, double the recipe and share with a friend or multiply the ingredients by ten and serve it on the buffet table! You could even prepare these the day before (without grilling them of course) and have them for lunch the next day at work or school! They're best eaten warm so a microwave oven would be a plus but they could absolutely be served cold as well, no problemo.

Hope you enjoy this recipe just as much as I did!

Black Bean and Sweet Potato Quesadillas


Yields: 1 serving

- 1 gluten free brown rice tortilla (or tortilla of your choice, I use BFree wraps)

- 1 small sweet potato (approx. 100 g when peeled)

- 4 tbsp canned black beans, drained and rinsed

- 2 tbsp tomato salsa/sauce

- 1 tbsp vegan sour cream (optional)

- A handful baby spinach leaves

A pinch each of

- dried coriander

- cumin

- paprika powder 

- salt

Guacamole:

- 1/2 avocado

- 1/2 tbsp nutritional yeast

- 1 tsp lemon juice

- Salt and pepper to taste

- Dried chili flakes (optional)

How to:

1. Start by making your guacamole: Place all ingredients into a small bowl and blitz with a hand blender a few times. Intuitively, the longer you blend the smoother your guac will be so stop when you've reached the desired consistency. Set aside while you prepare the quesadillas.
2. Peel and slice the sweet potato thinly, then steam or boil the slices until they're soft enough to pierce with a fork. This will take approximately 5-10 minutes.
3. Mash the steamed sweet potato with a fork and spread it out evenly on half of the tortilla.
4. On the layer of sweet potato, divide the black beans evenly and sprinkle with cumin, coriander, salt and paprika powder.
5. Cover the other half of the tortilla with a layer of vegan sour cream mixed with tomato salsa and stick a handful of baby spinach leaves to it. 
6. Fold the tortilla in half and cut in 4 "pizza slices".
7. Grill in a grill pan (or a regular but then it won't be as beautifully charred) for a couple of minutes on each side, top with guacamole and serve!

My Basic Hummus Recipe + Oven-roasted Squash

Happy birthday to me! Or happy belated to be correct, my 18th was this Monday. Yay! I can now... uh, buy beer, vote and (in the best of worlds) get my driver's license. Fun! But what's got me really excited is my birthday presents. Can you tell from the picture below what I got?

You guessed it: CHICKPEAS! My wonderful parents gave me a whole truckload of these gu... Wait a second. I'm just kidding. No offence chickpeas but you don't really make the best birthday presents. Okay so if you still haven't figured it out, I got a camera. A Canon EOS 700D that I know absolutely nothing about and have no idea how to use but still - a camera! C-A-M-E-R-A. Meaning this blog won't be nearly as boring from now on. So onto today's recipe:

There are many things that I've learnt to love since going vegan. Bananas, avocados, bell peppers, tofu bur first and foremost I've come to appreciate the beauty that is a perfectly creamy hummus. Everyone who's been following me on Instagram for a while probably knows that I've got a real sweet tooth and rarely choose savoury food if there is any kind of fruit around. With one exception. Hummus. A thick layer spread on a rice cake and my day is made. Hopefully you all like this recipe as well!


My Basic Hummus Recipe


Yields: 1-2 servings

2/3 cup cooked chickpeas

1 tbsp almond milk (Or olive oil if you want an even creamier texture)

1 tbsp nutritional yeast

1-2 tsp freshly squeezed lemon juice

Salt to taste

Optional: 1/2 tsp Paprika powder 


Blend well!
How to:
1. Place chickpeas in a colander in the sink and rinse to get rid of any excess sliminess from the can.
2. Blend all ingredients in a small bowl using a hand blender. Food processors are not recommended for this recipe.
3. Sprinkle with sesame seeds or drizzle with olive oil. Serve as a condiment to falafels, pita bread dishes, salads or maybe the roasted squash below!


Oven-roasted Herb-rubbed Winter Squash


Yields: 2 servings

1/2 small muscat pumpkin or winter squash of your choice

1 zucchini

1 tbsp olive oil

Herbs such as rosemary, thyme and oregano

Salt and pepper to taste

How to:
1. Pre-heat oven to 225C.
2. Cut your squash into halves and scoop out the seeds and the slimy, stringy things surrounding them. Save the other half of your squash in the fridge, unless you want bigger servings, then go ahead and use both halves.
3. Slice the squash about 1/2-inch thick for each slice and put aside.
4. Cut the zucchini lengthwise and slice in 1/2-inch thick slices.
5. Place the vegetables on a lined baking tray and rub with first olive oil then herbs. Spread out evenly on the tray and rosy in the oven for 20-25 minutes or until the squash is soft enough to pierce with a fork.


Double Trouble Peanut Butter Banana Ice Cream

Another banana ice cream recipe that I hope you'll enjoy as much as I do! Prepare for DOUBLE trouble with peanuts both in the ice cream and on top...


Banana Ice Cream:

3 medium sized sliced and frozen bananas

1/4 cup of almond milk

1 1/2 tbsp all natural peanut butter

Pinch of salt

Peanut Butter Sauce:

1 tbsp peanut flour

3/4 tbsp almond milk

1 tsp liquid sweetener of choice (I use date syrup)

Optional: 1 tsp of cacao/cocoa and 1 tbsp almond milk (instead of 3/4) for a chocolate peanut butter sauce

How to:
1. Start by making your peanut butter sauce. In a small bowl (Well. I use a shot glass but that's just me.), mix all of the ingredients with a fork until no clumps remain. Easy peasy.
2. If you want your peanut butter to be evenly divided throughout the ice cream, thin it out with a  the almond milk first. Stir in little by little until you have a runny sauce. If you'd rather have peanut butter chunks, feel free to skip this step.
3. Place your bananas and a sprinkle of salt in your high speed blender/food processor and blend on high for about a minute or until there are no bigger pieces of banana left.
4. Carefully remove the top cap/lid on your nana ice cream maker and slowly, as you blend, pour in the almond milk and peanut butter mixture. (Or each of them separately if you skipped the second step.)
5. Blend until you have a wonderfully creamy and smooth consistency. Stop to scrape down the sides if necessary.
6. Spoon up in a bowl/jar, top with the peanut butter sauce and a handful of crushed peanuts and cacao nibs if you so wish, eat and enjoy!

Strawberry Vanilla Nana Ice Cream

So. Only today did I realise that there is not a single banana ice cream recipe to be found on this blog.   This shan't be the case on a blog owned by nana ice cream's no. 1 fan! (Me!) Please accept my sincerest apologies. Let's just pretend this recipe has been here since the dawn of time lalala. Just smile and wave boys, just smile and wave. 


I may not be the most dedicated blogger but I do care a lot about my followers and I appreciate you all so incredibly much, you literally have no idea. In the future there will be a thorough step-by-step guide uploaded on here but for now, this will have to do. Hope you enjoy the recipe!

Strawberry Vanilla Nana Ice Cream (Finally!)


Serves: 1

Cook time: 5 minutes, tops.

Ingredients:

3 medium sized ripe bananas, sliced and frozen

1/4 cup unsweetened almond milk

1/2 tsp vanilla extract or a pinch of pure vanilla powder

1/2 cup frozen strawberries


How to:
1. Place all of the ingredients except for the almond milk in your food processor/high speed blender.
2. Blend on high until there are only very small pieces of frozen fruit left. This should take about a minute or so.
3. Now, carefully remove the small top lid/cap on your food processor/blender and slowly pour in the almond milk, while blending on high.
4. Watch magic happen. (Ok, you may have to stop and scrape down from the sides a few times but seriously, let the blender do the job. No need to poke around in there too much.)
5. Once the ice cream has turned into a creamy, luscious swirl of amazingness, turn the blender off, spoon up in a jar, bowl or whatever floats your boat, top with coconut chips and devour immediately!

Pasta con Funghi


Pasta con Funghi

Yields one big serving or two small ones.

Cooking time: Approximately 25 min.

2/3 cup uncooked brown rice fusilli or pasta of your choice

Sauce:


1 1/2 cups sliced brown mushrooms

1/2 cup almond milk

2 tbsp vegan cream substitute (I used Oatly's oat cream)

1/2 tbsp brown rice flour or thickening of your choice

1 tsp dijon mustard

1/2 tsp vegetable bouillon powder

1 tbsp nutritional yeast

Salt, pepper and lemon juice (optional) to taste

Start by bringing a pot of water to the boil, to cook your pasta in later.

How to:
1. Place all of the above ingredients except for the brown rice flour, mushrooms and nutritional yeast in a small saucepan.
2. Bring the mixture to the boil.
3. Stir, then lower the heat and let simmer for a few minutes.
4. Next, add the brown rice flour (preferably through a sieve) and whisk as you go.
5. Put the nutritional yeast in, whisk again and leave the sauce to thicken over low heat while you prepare your mushrooms. (At this stage you could put your pasta in the boiling water so the all the components can be ready at the same time!)
6. In a separate pan, lightly sauté the mushrooms to cook some of the liquid off. You might want to use a bit of cooking oil in the bottom unless you have access to a non-stick pan.
7. Fold the sautéed mushrooms into the sauce, have a taste and add more seasoning if it needs it. Let simmer for a few more minutes for a thicker consistency.
8. Toss the pasta in the sauce and top with a few sun-dried tomatoes if you'd like!

Enjoy!

Pumpkin Pie Pancakes


Pumpkin Pie Pancakes

Dry ingredients:


1/3 cup buckwheat flour

2 tbsp coconut flour

1 tsp baking powder

1 tsp pumpkin pie spice

Wet ingredients:

1 chia or flax egg (1 tbsp ground chia/flax seeds mixed with 3 tbsp water)

1 ripe banana, mashed

1/3 cup pumpkin purée 

3 tbsp almond milk

How to:
1. Start by preparing your chia egg. Grind the seeds either using a coffee blender or by hand with a mortar and pestle. Put the ground seeds in a small glass/bowl with 3 tbsp of water and whisk vigorously for 30 seconds or so to prevent clumping if you're using ground chia seeds. let sit and swell while you prepare the rest.
2. In a small bowl, mix all the dry ingredients with a fork until the baking powder is evenly divided.
3. Add the mashed banana, pumpkin puree and almond milk to the dry ingredients and stir until smooth.
4. Lastly, add in the chia/flax egg.
5. Let sit on the countertop for a few minutes (the batter should be THICK) and pre-heat a pan over low to medium heat.
6. Fry in a little coconut oil (unless you have a non-stick frying pan) on medium heat for a couple of minutes on each side.

Chocolate sauce:

2 tbsp plant-based yoghurt
1/2 tbsp cacao or cocoa powder
1/2 tbsp liquid sweetener of your choice (I used date syrup)

How to:
1. Simply mix all of the above with a fork/spoon until smooth. Pour on top of your pancake stack and decorate with a spoonful of plain yoghurt to create the cobweb pattern.

Enjoy!


Vegan Cinnamon Rolls

Hey there! It's been a while, I know. I have unfortunately run out of excuses so a humble apology will have to do. But these utterly scrumptious cinnamon rolls make up for it, I swear. Super easy to make and only require three quarters of an hour to prove. No gluten, refined sugar or any nasty ingredients at all. Just pure, sinless deliciousness.

They ARE kind of miniature so you might want to double the recipe. Or triple. Or whatever you want. So what are you waiting for? Get baking!


Vegan Cinnamon Rolls (Gluten Free!)


Dry ingredients:

1/3 cup + 1 tbsp (65 g) brown rice flour

1/3 cup + 1 tbsp (65 g) buckwheat flour

2 tbsp potato- or cornstarch (25 g)

3 tbsp (40 g) raw sugar or granulated sweetener of your choice 

1 tsp psyllium husk

1 tsp cardamom

2 tsp dry yeast

A pinch of salt

Wet ingredients:

1/2 cup + 1 tbsp almond milk

2 tbsp (30 g) coconut oil

Filling:

8 small dates (85g)

1 tbsp coconut oil (15 g)

1 1/2 tsp ground cinnamon

A pinch of vanilla bean powder

1/2 tbsp of almond milk

How to:

1. In a bowl, combine all of the dry ingredients and stir well. (Sifting the potato starch before you stir it in will prevent clumping). 
2. Melt the coconut oil over low heat and pour in the almond milk. Once lukewarm, transfer the oil/milk mix to the bowl with the dry ingredients. Don't let the temperature go over 37C or you WILL kill the yeast. No bueno.
3. Stir. Stir, stir, stir. Then knead the dough until it forms a moist ball, not too sticky, not too dry. If it is, add a bit more flour or almond milk. Leave to prove under a damp kitchen cloth for 45 minutes.
4. Meanwhile, start preparing the filling. Place all of the ingredients in a bowl and blend with a hand blender. I find that blending small quantities like this works best without a food processor but feel free to give that a try if you want to double the recipe.
5. That's about it for the filling. Now you'll have to wait for the dough.
6. Once the proving time is up, roll the dough out into a rectangle on a floured surface (however thin you want it to be) and spread the filling out on top.
7. Roll the dough into a tight spiral lengthwise and cut up in 1-inch sections.
8. Place the rolls on a lined baking tray and once again let them prove under a damp kitchen cloth for 30 minutes and pre-heat your oven to 190C
9. Next, brush on a bit of water-diluted syrup if you want to and bake in the oven for about 10-12 minutes depending on size.
10. Remove from the oven and let cool for a few minutes. 
11. Eat.

Pumpkin Pie Oats

As September progresses, it's gradually getting colder, the trees are changing colour and different kinds of pumpkins are starting to pop up here and there in the grocery stores. My favourite winter squash is the butternut squash; sweet, creamy and incredibly versatile! I promise to share my best pumpkin soup recipe with you in the future, but for now these pumpkin pie oats will have to do. They're well worth a try!


Pumpkin Pie Oats


1/2 cup oats

1 cup almond milk

1 tsp pumpkin pie spice

3 tbsp puréed pumpkin or butternut squash

3-4 small dates, mashed or chopped or 1 tbsp liquid sweetener of choice

A pinch of salt

How to:
1. Add oats, almond milk and a dash of salt to a small saucepan and bring to the boil. 
2. Let simmer on a low heat for a few minutes until it has thickened up a bit. 
3. Add the pumpkin pie spice, pumpkin purée and dates and stir until they have been well incorporated. 
4. Cook for a few more minutes or until you've reached your desired consistency. pour the porridge into a bowl and top with yummy fruit, nuts or nut butter!

Spiced Up Rawnola

I know I haven't been updating much as of late, but school has just started and is really keeping me busy as well as keeping me from blogging. I thought it'd be nice to get away from the schoolwork though (i. e. desperately looking for distractions) so yesterday I made a batch of -believe it or not- rawnola! Yup, you heard it right, this rawnola is in fact RAW, meaning it's packed with nutrients and vitamins otherwise lost when you bake your granola, meaning it's the perfect "healthier" alternative to your regular "ALL NATURAL SUPER-GOOD-FOR-YOU GRANOLA" (pff, they put so much crap in breakfast cereal nowadays I wouldn't know where to begin). If you really can't live without that extra crunchiness you get from baking the granola, I suggest you go check out this post instead. There I've shared my favourite granola recipe, one that is actually healthy for real, gluten-free AND refined sugar free. Either way you're in for a treat. Here we go.


Spiced Up Rawnola 


50g (1/2 cup) raw oats (most oats have been steamed for longer shelf life, the fully raw ones are almost impossible to find though, so any oats you have will work just fine for this recipe)

140g (about 1 cup packed) pitted medjool dates

40g (2 big) dried figs

20g (3 tbsp) whole flax seeds

1/2 tsp ground cardamom

1/2 tsp ground cinnamon

Or any spices/superfood powders you have at home!

Optional: A handful of shredded coconut/chopped nuts/cacao nibs

1. Place all ingredients except for the flax seeds (this is very important that you don't, flaxseed oil goes rancid very quickly!) and pulse until you have a chunky mixture that holds together in smaller clumps, like real granola does. Transfer to a jar or bowl, stir in the flax seeds (or incorporate them using your hands) and store in the fridge or freezer.

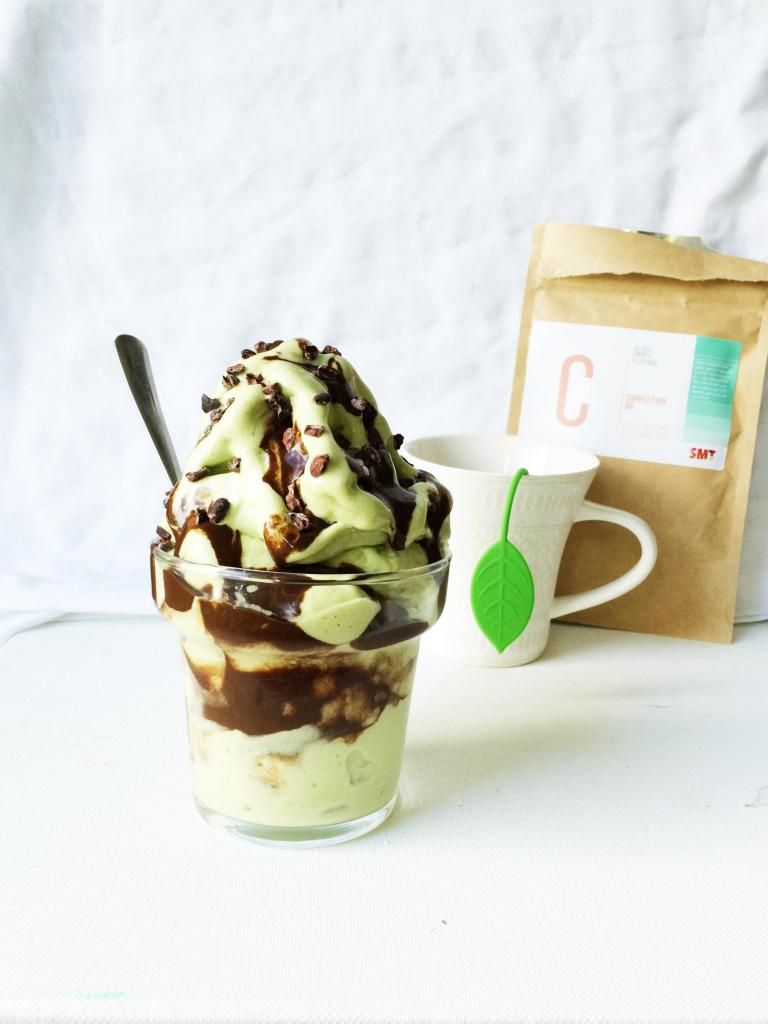
Mint Chocolate Chip Nice Cream

Mint chocolate chip has always been one of my ice cream favourites so I was really happy when I realized that I could totally do a healthy take on this good old classic using bananananas instead of cream. Plus, ice cream making doesn't get any easier than this. Just chuck it all in the food processor and watch magic happen!


Mint Chocolate Chip Ice Cream:

3-4 frozen bananas (~330g)

1/4 cup plant based milk

A few drops of peppermint oil or extract, adjust amount after strength

1 tsp matcha green tea powder

1/2 tsp wheatgrass (optional)

Chocolate sauce:

1 tsp liquid sweetener of choice

1 tsp cacao powder

1 tsp almond milk OR melted coconut oil

Optional:
Vegan chocolate chips/chopped dark chocolate/raw cacao nibs to serve as the chocolate chips


How to:
1. To make the ice cream, simply blend all ingredients in a food processor until completely smooth. I like to blitz everything until all the banana coins have been broken down by the blades before adding the milk. Do what works best for you though, and feel free to add more milk if it won't blend with 1/4 cup.
2. For the chocolate sauce, all you have to do is mix all the ingredients together with a fork. If you decide to use the coconut oil it will harden once you pour it onto the ice cream (provided it hasn't melted ofc) which is kind of cool. 
3. Spoon the nice cream up in a bowl or a tall glass, top with chocolate sauce and chocolate chips and serve immediately!


Creamy Chocolate Overnight Oats

I love to cook my oats on the stove top, the taste and texture really is superior to those of microwaved porridge, but, let's be honest here. Cooking them the traditional way does take a bit more time. Most mornings, that extra time doesn't bother me at all. I'm an early bird (ok, maybe not, but I'd like to think that I am. However, I always set my alarm to the-whole-world's-still-fast-asleep-why-are-you-up o'clock, so what difference does it make?) and I don't mind spending some more time making my breakfasts taste good. But there comes a time in every 17-year-old's life when all you want to do is sleep. Well, several periods of time to be precise. When getting ready for school seems as impossible a task as climbing the highest mountains and when dozing off, sprawled out on the couch at 3 p.m., becomes a habit rather than an exception.  For me, one of those lazy sleep-cycles has just emerged and most days I just want to remain horizontal for as long as I can. What to do with the morning oats then? The oh-so-simple answer is; have them prepared the night before! Genius!

So why haven't you seen more of these über quick breakfasts on my Instagram then? Well to be honest, I've never really liked them, except for a recipe I tried a few months ago, for carrot cake overnight oats (from one of my best Instagram friends Meghan's blog! Thanks Meghs!) which I really liked. But yesterday, I decided to make a recipe of my own, just so that I could stay in bed for a few more (precious) minutes. Turns out that this recipe was actually so good that I have to share it with you guys! So here goes, Creamy Chocolate Overnight Oats!


Recipe:

1/2 cup oats

1/2 cup + 2 tbsp. almond milk

1/4 cup plant-based yoghurt of choice

1 tbsp chia seeds

1-2 tbsp liquid sweetener of choice (I used about 2 tbsp of date purée)

1/2 tbsp cacao or unsweetened cocoa powder

A pinch of salt (optional, but I've found it really elevates the chocolate flavour)

How to:

1. Simply mix all of the ingredients in a bowl or a pretty jar, and stir until they're evenly combined. Put in the fridge for a few minutes, then take it out and stir again so that the chia seeds don't clump up. 
2. Let the oats sit in the fridge until they've thickened up, preferably overnight so you have your breakfast ready to go the next morning! Top with fresh fruit, nut butters or whatever you prefer. Eat, and relish the fact that you get to have chocolate for breakfast. Vegan, gluten-free, healthy and absolutely scrumptious chocolate oats.

Mint Chocolate Chip Pancakes


Dry:

1/3 cup buckwheat flour

2 tbsp. coconut flour

1 tsp. baking powder

Wet:

1 chia egg (1 tbsp. ground or whole chia seeds + 3 tbsp. water)

1 small banana, mashed

1/3 cup almond milk

Mint:

1 tsp. matcha green tea powder

½ tsp. wheatgrass powder

A few drops of peppermint oil or extract (adjust amount according to strength and preference)

Chocolate Chip:

½ tbsp. cacao or carob powder

¼ Squarebar (optional) or ½ tbsp. cacao nibs

How to:
1. First, stir all the dry ingredients together with a fork, to make sure the baking powder is evenly incorporated into the batter. 
2. Prepare your chia egg by grinding your chia seeds either by hand or using a coffee grinder. You could leave them whole but then they’ll take longer to thicken so I prefer doing it this way. 
3. Mix the ground seeds with water, stir and leave to thicken.
4. Mash your (ripe!) banana, fold it into the flour mix along with the other wet ingredients and stir until no clumps remain. 
5. Transfer ½ of the mixture to another bowl, set that aside and mix the rest with the carob or cacao powder. If you want chocolate chips in your pancakes, fold in ¼ of a chopped Squarebar/ ½ tbsp. raw cacao nibs/ 1 tbsp. chopped dark chocolate.
6. In the other bowl, mix the other half of the batter with matcha powder, wheatgrass powder and peppermint extract. Now we have both our chocolate chip and our mint pancakes!
7. Fry the pancakes over medium to high heat for a couple of minutes on each side. Stack, drizzle with chocolate sauce (the one I used is just 1 tbsp chocolate peanut butter thinned out with a splash of almond milk) and add whatever toppings you want!

Minty-breath-kisses, Tilda ;)